Recently, I purchased the iMortor 3.0 electric bike conversion kit and I have to say that I am extremely satisfied with it. As a passionate cyclist, I was looking for a way to give my reliable Alubike a bit of an impetus, and iMortor 3.0 conversion wheel looked like a great solution.
After two weeks of eager waiting, the time had come and I plunged into my e-bike conversion project.
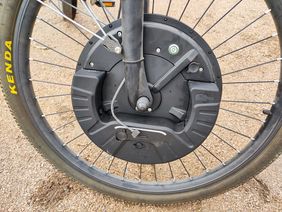
What´s inside?
I ordered the iMortor 3.0 app version, which includes only the wheel but without display, brake sensor and PAS sensor.
The 26" wheel itself was delivered with everything you need to start cycling right away:
- wheel rim
- hub
- tire
- 36V 350W permanent magnet brushless DC motor
- detachable 36V 7.2Ah battery
- brake rotor
In addition, the box also included the following items
- charging cable
- phone mount
- installation tools: wrench, screwdriver, and cable ties
- a manual
Note: It's important to note that the delivery scope may differ between sellers, so it's always best to carefully read the product description and check what's included in the package before making a purchase.
Installation
Installing the iMortor 3.0 conversion wheel on a bicycle is a relatively simple process, but it requires some technical knowledge. Here are the basic steps you will need to do:
- Remove your existing front wheel of your bike: First you will need to remove the existing front wheel of the bike. Use a wrench to loosen the nuts or a quick release lever that holds the wheel in place, then carefully remove the wheel.
- Install the iMortor conversion wheel: You will need to install the iMortor conversion wheel on your bike´s dropout. Carefully slide the conversion wheel axis through your bike´s dropouts, then tighten the nuts or a quick release lever to attach it in place.
- Install a disc brake rotor: If your bike has disc brakes, you will need to install the attached disc brake rotor on the iMortor conversion wheel.
- Adjust the brake hug: by inserting the disc brake rotor, you will need to adjust the brake clamp to make sure it is properly linked to the rotor.
- Insert the battery, make sure it is fully charged.
- Turn on the power and connect your phone to the motor via bluetooth.
- Since this is the app version, make sure you have a phone mount attached on your handlebar.
Note: If you are experiencing any problems during the installation process or by testing the iMortor conversion wheel, do not hesitate to consult the instructions or contact the customer support.
The app
The iMortor 3.0 conversion wheel comes with a mobile app that you need to control the wheel motor and to monitor the battery power. There is an app version for both Android and iOS devices.
In the middle you can see the current speed, below you can choose between five different speed modes. In addition, the current mileage, the ride time, calories burned and the battery level are displayed underneath. At the bottom, you can edit your profile and make your parameter settings.
To get started, I recommend the following steps:
- Download and install the iMortor 3.0 app
- Create a profile
- Connect your device to the iMortor 3.0 conversion wheel via bluetooth (turn on the motor first)
- Go to the parameter setting to make your preferred settings, e.g. unit, diamater, speed limit, cruising
One of the exclusive features of the programs is the ability to switch five different driving modes that offer different levels of help. Cyclists can choose the following modes that have increasing power levels in the following order:
- Physical
- Eco
- Econmic Model
- Sport
- Climbing
Testing the speed modes
Soon after the conversion wheel was installed, I took my new "e bike" for a ride to try all five speed modes. Let me tell me that I was instantly intrigued by the iMortor 3.0's performance. My chosen test route was in an extremely hilly environment.
Test conditions were as follows:
track distance: 180 meters
altitude gain: 8 meters
Find below a brief description and a summary of my tracked performance data for each of the five speed modes
Physical exercise
The rider can use their own physical strength to propel the bike forward in the physical mode, which is intended for physical activity. For those who enjoy exercising and want to get a good workout while riding their bike, this mode is ideal.
Tracked performance data:
overall time: 54 seconds
average speed: 12.15 km/h
max. speed: 15.36 km/h
Eco Mode
Eco mode is all about efficiency, extending the electric bike's range, and preserving battery life. The rider still gets some exercise while using less power in this mode thanks to the motor's moderate assistance.
Tracked performance data:
overall time: 50 seconds
average speed: 12.74 km/h
max. speed: 15.90 km/h
Economic model mode
Economic mode is like Eco mode in that it prioritizes battery life and efficiency, but it also slows the bike down to save energy. For commuters who want to use their electric bike to get to work without using up the battery too quickly, this mode is ideal.
Tracked performance data:
overall time: 46 seconds
average speed: 13.16 km/h
max. speed: 16.92 km/h
Sports mode
Sports mode emphasizes power and speed. The rider can reach higher speeds with less effort in this mode, which maximizes the motor's assistance. Sports mode is ideally suited for cyclists who need to stretch their boundaries and partake in a speedy ride.
Tracked performance data:
overall time: 40 seconds
average speed: 13.97 km/h
max. speed: 20.25 km/h
Climbing mode
At long last, the climbing mode is intended to assist riders with handling steep slopes and grades. To help the rider climb steep hills without putting too much strain on the motor or battery, the motor provides maximum torque in this mode.
Tracked performance data:
overall time: 34 seconds
average speed: 17.57 km/h
max. speed: 24.02 km/h
Conclusion
What I was most impressed with iMortor 3.0 was how it was integrated smoothly with my Alubike. The conversion wheel looked like it should have been there, and the overall appearance of the bicycle was by no means damaged.
The iMortor 3.0´s battery life is also quite impressive. With one charging, I was able to travel about 30 kilometers away, which is more than enough for an average daily trip to work and back.
In general, I am extremely satisfied with the iMortor 3.0 conversion wheel. It certainly gave my Alubike new life and allows for extended bike trips without much effort. If you are looking for a simple way to convert your bike to an electric bike, I highly recommend checking the iMortor 3.0 conversion wheel.
Want to learn more? Enjoy this video.
Comments (0)
No comments found!